

Quickstart for x402
This quickstart runs top to bottom. By the end, you will have paid
$0.001 in MUSD on Mezo Testnet against your own local Express seller server
using the @x402/* SDKs — with the out-of-box @x402/paywall browser UI
doing all the client-side work, so you write zero client code.
For the conceptual context of what x402 is, start with the x402 Overview.
What you will build
Section titled “What you will build”A single-file Express server whose root route / is gated behind an
MUSD payment:
- A browser hitting
/without payment getsHTTP 402 Payment Requiredwith the bundled@x402/paywallUI — wallet connect, pay, and retry are all handled for you. - A programmatic client (
curl,fetch, an AI agent) gets the same402with a compact JSON body and the machine-readable payment requirements in aPAYMENT-REQUIREDresponse header. - After a $0.001 MUSD payment settles, the route unlocks and returns its JSON response.
The server you build is the exact code that runs the hosted demo at
https://demo.vativ.io/ — you will pay the hosted
instance first to prove your wallet setup (Step 3), then stand up and pay
your own (Steps 4–6).
Prerequisites
Section titled “Prerequisites”- Node.js 20+ and pnpm 9+ on your machine.
- A browser wallet extension that supports EVM networks (MetaMask, Rabby, Coinbase Wallet, or any wallet that exposes an EIP-1193 provider).
- A current
@x402SDK. Mezo support ships in the default registries — Mainnet from@x402/evmv2.15.0 / Go v2.15.0 / Python v2.13.0 (2026-06-12), Testnet from earlier releases. This quickstart pins2.16.0, the version the hosted demo runs. See the Mezo x402 reference for the full matrix. - ~20–30 minutes. Getting testnet MUSD involves a faucet drip + a borrow transaction; run those early (Steps 1–2) and they’ll be ready by the time you need them.
Step 1: Set up your wallet
Section titled “Step 1: Set up your wallet”1a. Create two accounts
Section titled “1a. Create two accounts”Open your wallet’s account switcher. Your first account is Account A (Buyer). Add a second account is Account B (Merchant) using whatever name helps you tell them apart. Ensure Account A (Buyer) is selected/active.
1b. Add Mezo Testnet as a network
Section titled “1b. Add Mezo Testnet as a network”With either account selected, open your wallet’s networks settings and add a custom network with these parameters:
| Field | Value |
|---|---|
| Network name | Mezo Testnet |
| Chain ID | 31611 |
| RPC URL | https://rpc.test.mezo.org |
| Block explorer | https://explorer.test.mezo.org |
| Currency symbol | BTC |
For mainnet parameters and alternative RPC providers, see Set Up Developer Environment.
Step 2: Get testnet MUSD to pay with
Section titled “Step 2: Get testnet MUSD to pay with”MUSD on testnet is minted, not faucet-dispensed, you borrow it against testnet BTC.
Select Account A (Buyer) in your wallet before starting allowing all of Step 2 funds going to Account A. Account B (Merchant) stays empty throughout.
-
Request testnet BTC to Account A from the Mezo Faucet or the
#testnetchannel in Mezo Discord. Wait for the drip to land in A’s wallet. -
Borrow MUSD at mezo.org/feature/borrow with Account A connected on Mezo Testnet. Full walkthrough with screenshots: Borrow and Mint MUSD.
-
Confirm Account A’s MUSD balance. The testnet MUSD token contract is
0x1189…Ac503. You have two ways to check:- Explorer: open
https://explorer.test.mezo.org/address/<account-A-address>(paste Account A’s0x…into the URL). You should see MUSD listed with ≥ 1,800 balance. - Wallet: add
0x118917a40FAF1CD7a13dB0Ef56C86De7973Ac503as a custom token. Account A will then show an MUSD line item.
- Explorer: open
-
Confirm Account B shows zero MUSD — it shouldn’t have any, and won’t until Step 6. Check at
https://explorer.test.mezo.org/address/<account-B-address>.
The MUSD token page in the explorer is also useful if you want to cross-check the canonical contract address, decimals (18), or scan recent transfers.
Step 3: Smoke test your wallet config
Section titled “Step 3: Smoke test your wallet config”Before installing any packages or writing any code, confirm that your wallet, network, and MUSD balance are all ready by paying the live, hosted instance of this quickstart’s server. This isolates “did I set up my wallet correctly?” from “did I wire my own server correctly?” Any trouble you hit here is a wallet or MUSD issue, not a code issue.
-
Open
https://demo.vativ.io/in the same browser that holds your Mezo Testnet wallet. Switch to Account A (Buyer) before connecting — A has the MUSD. -
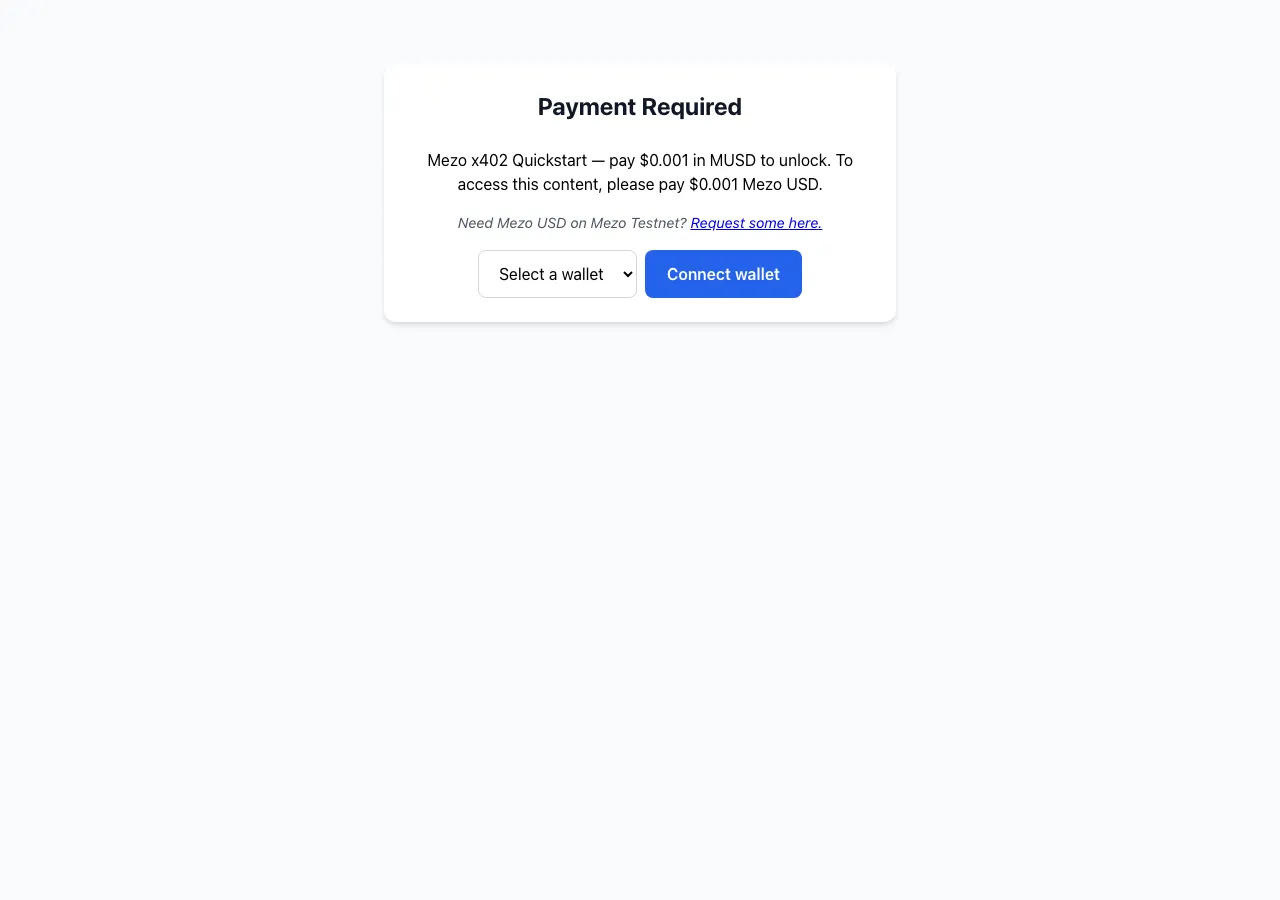
The paywall loads. You should see:
- A Payment Required heading
Mezo x402 Quickstart — pay $0.001 in MUSD to unlock. To access this content, please pay $0.001 Mezo USD.- A testnet hint (
Need Mezo USD on Mezo Testnet? Request some here.) - A wallet-select dropdown and Connect wallet button
-
Select your wallet and connect it from Account A. Confirm you are on Mezo Testnet (chain ID
31611) when the wallet prompts. -
Click Pay now, then sign the payment authorization in your wallet when prompted.
-
The paywall retries the request with your payment. Once the facilitator settles on chain, the unlocked response renders:
{ "ok": true, "message": "Paid! You unlocked the Mezo x402 Quickstart." } -
Verify the payment on chain. Open
https://explorer.test.mezo.org/address/<account-A-address>— you should see a fresh MUSD transfer out of Account A for0.001 MUSDto the demo’s receiving address (0xC337…e738— you will meet that address again as the defaultPAY_TOin the server code; your Account B’s balance will not change).
If the unlocked JSON appears and the explorer shows the transfer, your wallet setup is proven. Proceed to Step 4.
If you don’t get there, stop here and fix the wallet side before writing any server code — see Troubleshooting for common wallet/MUSD symptoms. A broken wallet at this step will look identical to a broken server at Step 6; sort it out now.
Step 4: Install x402 packages
Section titled “Step 4: Install x402 packages”Create a fresh project for your own seller:
mkdir mezo-x402-quickstart && cd mezo-x402-quickstartpnpm initpnpm add @x402/core@2.16.0 @x402/evm@2.16.0 @x402/express@2.16.0 @x402/paywall@2.16.0 express@^4.19.2pnpm add -D typescript tsx @types/express@^4.17.21 @types/nodeThe @x402/* versions are pinned to 2.16.0 — the release the hosted
demo runs — so what you build matches what you already paid in Step 3.
Newer releases generally work too; see the
SDK support matrix for the minimum versions per network.
Step 5: The seller, in one file
Section titled “Step 5: The seller, in one file”The seller wires together three pieces: an HTTPFacilitatorClient
that talks to the facilitator, an x402ResourceServer with the
"exact" EVM payment scheme registered for Mezo Testnet, and the
bundled @x402/paywall UI as the paywall provider. The
paymentMiddleware call then protects GET / with a $0.001 price.
Create server.ts inside mezo-x402-quickstart/ with exactly this
content — it is the demo server’s source file, verbatim:
/** * Mezo x402 Quickstart — the out-of-box @x402/paywall smoke test. * * Run this server and open http://localhost:4021/ in a browser: the * @x402/paywall UI renders. That is the smoke test. The root route `/` is * protected by the x402 payment middleware, so an unpaid browser GET returns * HTTP 402 with the paywall; paying $0.001 in MUSD unlocks a success response. * *   Network:     Mezo testnet — eip155:31611 (CAIP-2) *   Asset:       MUSD  0x118917a40FAF1CD7a13dB0Ef56C86De7973Ac503  (18 decimals) *   Price:       $0.001 (PRICE env overrides) *   Facilitator: https://facilitator.vativ.io  (verifies + settles payments) * *   pnpm install *   pnpm exec tsx server.ts    (monorepo: pnpm --filter mezo-x402-quickstart start) */import express from "express";import { paymentMiddleware, x402ResourceServer } from "@x402/express";import { ExactEvmScheme } from "@x402/evm/exact/server";import { HTTPFacilitatorClient } from "@x402/core/server";import { createPaywall } from "@x402/paywall";import { evmPaywall } from "@x402/paywall/evm";
// --- Config (override any of these via environment variables) --------------const PORT = Number(process.env.PORT ?? 4021);const NETWORK = "eip155:31611"; // Mezo testnetconst PAY_TO = process.env.PAY_TO ?? "0xC3376296a18ef364eA19287203EEd7a87f18e738";const FACILITATOR_URL = process.env.FACILITATOR_URL ?? "https://facilitator.vativ.io";const PRICE = process.env.PRICE ?? "$0.001";
const app = express();
// The facilitator verifies and settles x402 payments. The resource server// registers the "exact" EVM payment scheme for our network. @x402/evm already// knows Mezo testnet, so a plain "$0.001" price resolves to MUSD automatically.const facilitator = new HTTPFacilitatorClient({ url: FACILITATOR_URL });const resourceServer = new x402ResourceServer(facilitator).register(  NETWORK,  new ExactEvmScheme(),);
// The out-of-box @x402/paywall browser UI, scoped to EVM networks.const paywall = createPaywall().withNetwork(evmPaywall).build();
// Protect the ROOT route. A browser GET / with no payment renders the paywall.app.use(  paymentMiddleware(    {      "GET /": {        accepts: {          scheme: "exact",          price: PRICE,          network: NETWORK,          payTo: PAY_TO,        },        // No trailing period: the paywall appends ". To access this content, ...".        description: `Mezo x402 Quickstart — pay ${PRICE} in MUSD to unlock`,      },    },    resourceServer,    { appName: "Mezo x402 Quickstart", testnet: true },    paywall,  ),);
// Unlocked content — served only after a payment settles.app.get("/", (_req, res) => {  res.json({ ok: true, message: "Paid! You unlocked the Mezo x402 Quickstart." });});
app.listen(PORT, () => {  console.log(`Mezo x402 Quickstart listening on http://localhost:${PORT}/`);  console.log("Open it in a browser to see the @x402/paywall UI.");});
Reading it top to bottom:
- Config block. Everything environment-specific is an env-overridable
constant.
PAY_TOdefaults to the hosted demo’s receiving address — the same0xC337…e738you saw in Step 3’s explorer check — and you will override it with your Account B in Step 6. The price is a constant too:PRICE(default$0.001) flows into both the payment requirements and the paywall copy, so overriding it (e.g.PRICE='$0.005') re-prices the route end to end. HTTPFacilitatorClient+x402ResourceServer. The facilitator atfacilitator.vativ.ioverifies and settles payments; the resource server registers the"exact"EVM scheme foreip155:31611. A plain dollar-stringprice: "$0.001"resolves to the right MUSD amount at runtime — no token address in your code.createPaywall().withNetwork(evmPaywall).build(). The bundled browser UI, scoped to EVM networks. Without this provider the middleware falls back to a stub that formats amounts as 6-decimal USDC and shows an “Install @x402/paywall” placeholder.paymentMiddleware(...). ProtectsGET /. The third argument is the paywall config —appNamebecomes the page title, andtestnet: truerenders theNeed Mezo USD on Mezo Testnet?faucet hint you saw in Step 3.- The unlocked route. The plain
app.get("/")handler only runs after the middleware has verified and settled a payment.
(Technically you could set PAY_TO to Account A and pay yourself, but
then a successful payment is invisible on chain: MUSD leaves A and lands
in A, so the token balance doesn’t change. Two accounts give you a clean
before/after signal in the explorer.)
Step 6: Run your seller and pay it yourself
Section titled “Step 6: Run your seller and pay it yourself”Switch your wallet to Account B (Merchant), copy its 0x… address,
and start the server with that address as the receiving address:
PAY_TO=0xYOUR_ACCOUNT_B_ADDRESS_HERE \ pnpm exec tsx server.tsYou should see Mezo x402 Quickstart listening on http://localhost:4021/.
The middleware now intercepts unpaid requests to /. What a client gets
back depends on how it identifies itself: a browser (an
Accept: text/html header plus a browser User-Agent) receives the full
HTML paywall page; everything else (curl, fetch, httpie, an AI
agent) receives a compact JSON body with the payment requirements
Base64-encoded in a PAYMENT-REQUIRED response header. Either way, no
client-side code is required.
-
Sanity check that the server responds
402:Terminal window curl -s -o /dev/null -w "%{http_code}\n" http://localhost:4021/# Expect: 402(The paywall UI only renders in a browser — that’s the next step.
curl -ion the same URL shows the402status plus thePAYMENT-REQUIREDheader carrying the machine-readable payment requirements — decode it withbase64 -dto see the same scheme/network/amount/payTo your route config declares.) -
Open
http://localhost:4021/in the same browser you used for the live-demo smoke test in Step 3. Switch to Account A (Buyer) before connecting — that’s the account with MUSD. -
The paywall loads — the same UI as Step 3, but now served by your own code:
-
Connect Account A, confirm Mezo Testnet (chain ID
31611), click Pay now, and sign the authorization in your wallet. -
The paywall retries the request. Once the facilitator settles on chain, the unlocked JSON response renders:
{ "ok": true, "message": "Paid! You unlocked the Mezo x402 Quickstart." } -
Verify the A → B transfer on chain. Open both explorer tabs:
- Account A (debit):
https://explorer.test.mezo.org/address/<account-A-address> - Account B (credit):
https://explorer.test.mezo.org/address/<account-B-address>
You should see a single MUSD transfer of
0.001 MUSDleaving A and arriving at B at the timestamp of your payment. Click the transaction hash on either side to see the settlement details, including the facilitator address that paid gas. - Account A (debit):
That’s the full loop: you’ve just served a paywalled HTTP resource on Mezo Testnet, paid for it from Account A, and watched the MUSD land in Account B on chain.
Promote to mainnet
Section titled “Promote to mainnet”Everything above runs on Mezo Testnet. Moving the same seller to Mezo
Mainnet (eip155:31612) is a one-line change — a current SDK resolves the
mainnet MUSD token and the canonical settlement proxy for you, and the
facilitator is the same endpoint.
In server.ts, switch the network constant:
const NETWORK = "eip155:31611"; // Mezo testnetconst NETWORK = "eip155:31612"; // Mezo mainnet| What | Testnet → Mainnet | Change needed |
|---|---|---|
NETWORK (CAIP-2) | eip155:31611 → eip155:31612 | Yes — the one line above |
PAY_TO | your testnet address → your mainnet address | Yes — always set it explicitly on mainnet |
| MUSD asset | resolved by the SDK on both nets | No — DEFAULT_STABLECOINS maps it |
| Facilitator URL | facilitator.vativ.io on both nets | No — same facilitator serves both |
| Settlement proxy | canonical on both nets | No — the SDK auto-resolves it |
Troubleshooting
Section titled “Troubleshooting”| Symptom | Cause | Fix |
|---|---|---|
does not provide an export named 'DEFAULT_STABLECOINS' at runtime | A transitive dependency is pinning @x402/paywall/@x402/evm to a release older than your target network needs (Mainnet needs ≥ 2.15.0, Testnet ≥ 2.10.0) | Force both to a current release via your package manager’s overridespnpm — add to package.json (top level, alongside dependencies), then pnpm install:<br/>"pnpm": { "overrides": { "@x402/paywall": "^2.16.0", "@x402/evm": "^2.16.0" } }<br/>npm — top-level "overrides": { ... }, then npm install.yarn — "resolutions": { ... }, then yarn install.Override both packages together — @x402/paywall imports DEFAULT_STABLECOINS from @x402/evm. |
Paywall shows $10000000000.00 instead of $0.001 | Same as above — an older @x402 formats MUSD as 6-decimal USDC | Same fix — force |
install fails resolving @solana/kit@6.10.0 → @solana/keys@6.10.0 (no matching version) | @x402/paywall pulls a transitive Solana SDK whose 6.10.0 release references sub-packages not yet published (a transient upstream gap). EVM-only sellers never use the Solana paywall, but the dependency still resolves at install | Pin the last good version via an override, then reinstall: npm top-level "overrides": { "@solana/kit": "6.9.0" }; pnpm "pnpm": { "overrides": { "@solana/kit": "6.9.0" } }; yarn "resolutions": { "@solana/kit": "6.9.0" } |
EADDRINUSE: address already in use :::4021 | Another process is bound to port 4021 | Run lsof -i :4021 to find the holder, or run on a free port: PORT=5001 PAY_TO=0x… pnpm exec tsx server.ts |
tsx: command not found | tsx dev dep didn’t install, or command is being run outside the project directory | Rerun pnpm add -D tsx inside the project; invoke as pnpm exec tsx server.ts |
SyntaxError on import / TS syntax errors from Node | Using Node.js < 20 | Upgrade to Node.js 20+ (node --version to check) |
| Wallet prompts to switch network / payment never confirms | Wallet is on the wrong Mezo network | Confirm the wallet is on the chain ID the seller expects (31611 for Testnet, 31612 for Mainnet) |
402 Payment Required returned but paywall UI never renders | network string is not a CAIP-2 identifier | Use 'eip155:31611' or 'eip155:31612' exactly; 'mezo-testnet' and bare 31611 are both rejected |
| Wallet refuses to add “Mezo Testnet” — or adds it but balances / transactions look wrong | Chain ID entered in hex (e.g. 0x7A5B) when the wallet field expects decimal, or Mainnet chain ID (31612) used when you wanted Testnet | Enter the chain ID as decimal 31611 for Testnet (31612 for Mainnet). The RPC URL must also point at testnet (https://rpc.test.mezo.org) — a testnet chain ID against a mainnet RPC silently produces a network that looks real but holds nothing |
| Everything “works” but Account B never receives MUSD | PAY_TO wasn’t set (the server silently falls back to the hosted demo’s receiving address), or the address was typo’d — there is no format guard | Stop the server and restart with PAY_TO=0x… copied directly from your wallet’s Account B; re-check the explorer after the next payment |
Facilitator returns unsupported network | FACILITATOR_URL was overridden to a facilitator without Mezo support (e.g. x402.org/facilitator) | Unset FACILITATOR_URL — the built-in default https://facilitator.vativ.io serves both Mezo networks |
| Paywall loads but Pay now never settles, no error | Wallet has no MUSD, or MUSD is on the wrong network | Revisit Step 2; confirm the testnet MUSD token contract shows a balance |
| Step 3 demo (demo.vativ.io) never settles | Same wallet/MUSD/network issue — isolate here before proceeding to Step 4 | Do not skip the Step 3 smoke test; fix the wallet side before writing server code |
| Payment is signed in the wallet but the facilitator rejects it / verification fails | The asset’s EIP-712 domain name was hand-rolled incorrectly | MUSD’s EIP-712 domain name is Mezo USD (version 1), not the MUSD symbol — a mismatch fails signature verification. Let the SDK supply it via getDefaultAsset, or set name: "Mezo USD", version: "1" exactly if you build the asset metadata yourself |
| Running your own facilitator/settler: intermittent gas-estimation failures on Mezo | Mezo gas estimation needs modest headroom | Raise the gas limit / estimation multiplier at the signer. You won’t hit this with the hosted facilitator.vativ.io, which already accounts for it |
See also
Section titled “See also”- MUSD Payments with x402. Conceptual overview.
- vativ/mezo-hack/apps/humor.
The Mezo-specific hackathon reference: server +
@x402/fetchclient wired to the mezo.6 preview tarballs, paywalledGET /jokeat0.001 MUSD, points atfacilitator.vativ.io, README walks through wallet funding + running the demo end-to-end. Clone and adapt. - Borrow and Mint MUSD ↗. User-side flow for acquiring MUSD (opens in new tab).
- Mezo Faucet. Testnet BTC.